Configuration
How to proceed with the website general settings, like the title, description, changing the logo, selecting templates, how to configure one or multiple payment gateways (PayPal, Stipe, ...), configuring Amazon S3 and other file storage services, setting up the mailer to send and receive email message ... etc.
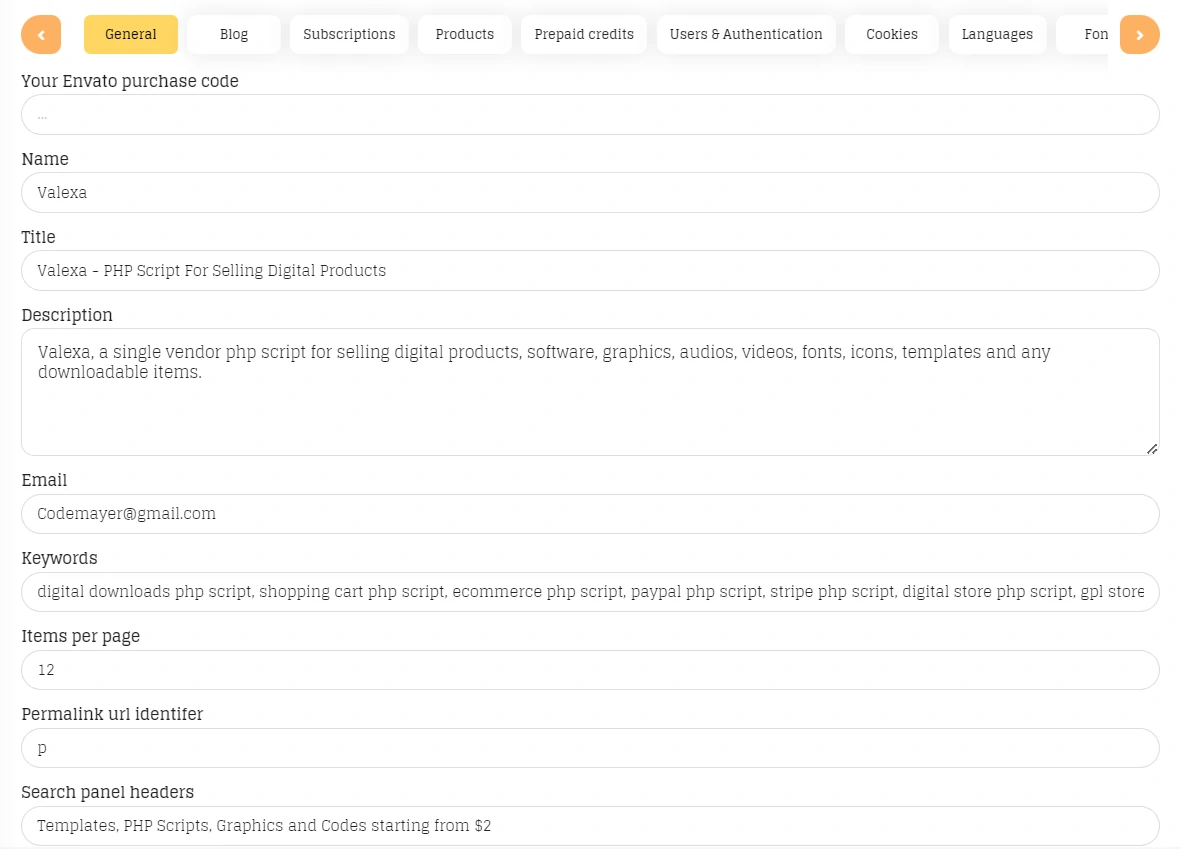
#General
Admin > Settings > General

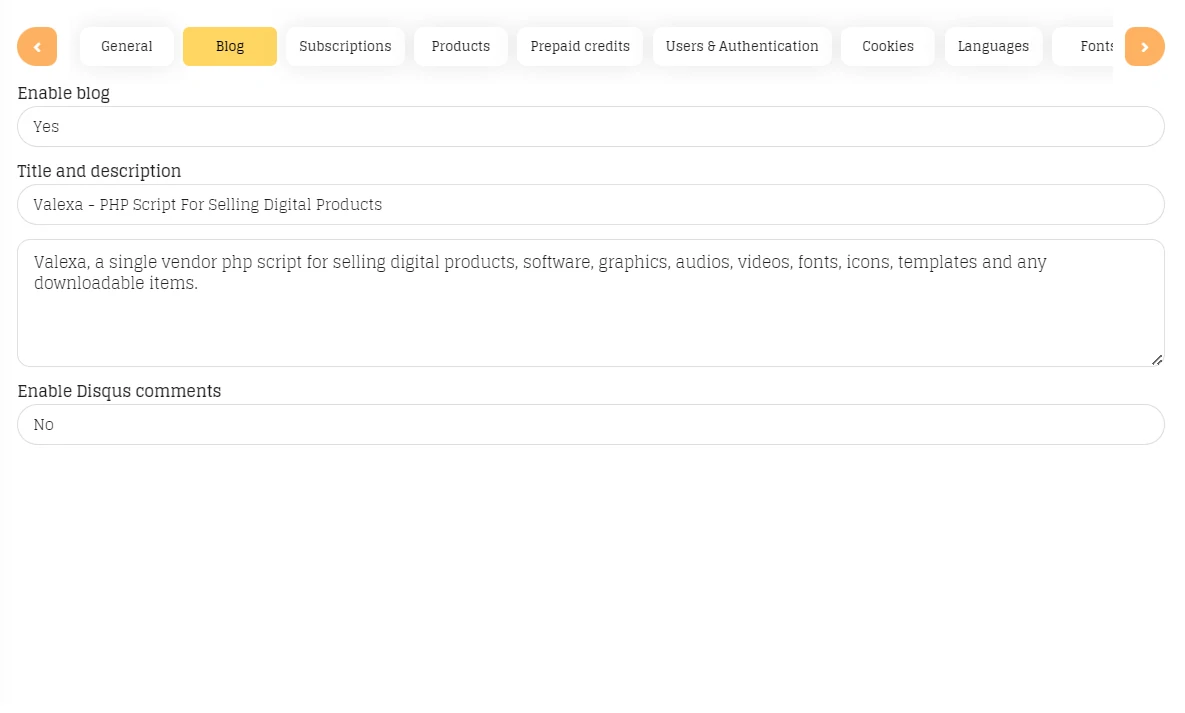
In the general settings page you can configure the following points :

General : Website title, name, descriptions, number of items to show per page, timezone, keyswords, permalink, main website email address, caching website data
Blog :Enabling the blog, description and title, Disqus comments
Subscriptions :Enabling subscriptions, ...
Products :Allow downloading files with test purchases, show add to cart button on the product card, show ratings, show sales, show video streaming player on the single product page, ... etc
Prepaid credits :Enable prepaid credits or E-wallet system, specifying an expiration time for credits.
Users & Authentication :Specifying the registration form fields and which ones are required, making the email verification required or not.
Cookies :Customizing the cookie popup, editing the cookie message.
Languages :Enable / Disable languages
Fonts :Use different fonts, from googSle fonts or local fonts
Templates :Change the template, loading custom CSS and Javascript code
Social :Enter URLs to your social accounts
Favicon, Logo, Cover, Watermark :Change the website logo, favicon and cover, use a watermark for product covers
Notifications :Enable / Disable receiving emaim notifications on new comments, reviews and sales.
Reviews and comments :Enabling comments and reviews, auto approving comments and reviews, editing own reviews, deleteing own comments, ... etc.
Debugging :Enabling / Disable debug mode for the website
Realtime views :Enable / disable realtime views with an additional fake mode option, set a range of views for fake mode, ...etc.
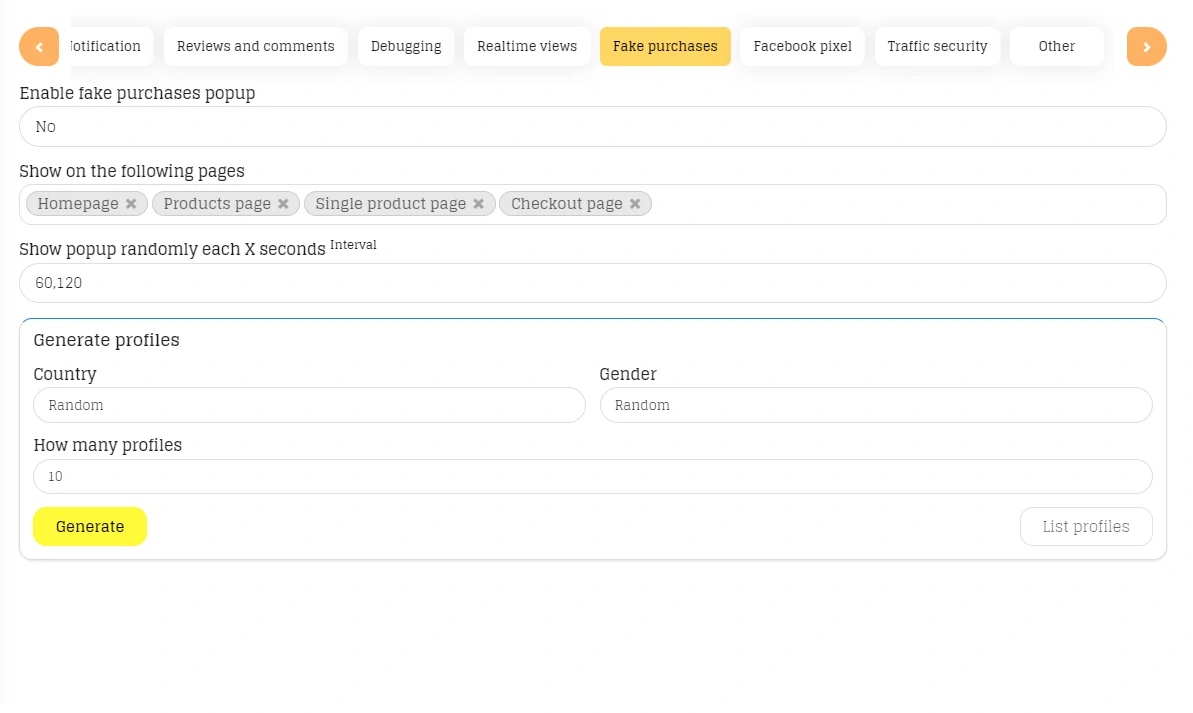
Fake purchases :Enabling / Disable fake purchases popup, select in which page to show the popup, generate fake profiles for fake purchases, specify when to the show the pop.
Facebook pixel :Enter a facebook pixel code to load on the website.
Traffic security :Select which web crawlers and bots to authorize accessing your website, limit the number of views per minutes for each user.
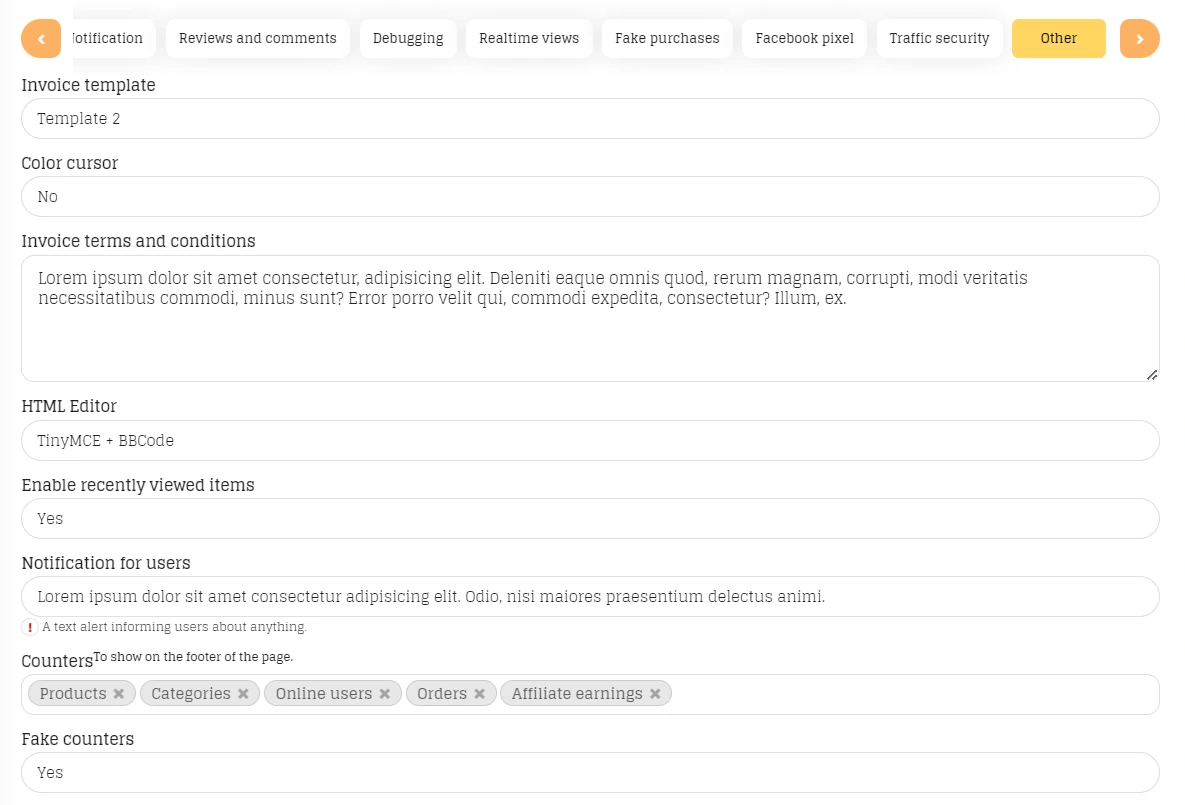
Other :Select the invoice template, show a color cursor on the website instead of the default one, select an HTML editor (Summernote or TinyMCE), Show counters on the website (users, orders, products ...).
#Mailer (SMTP)
Admin > Settings > Mailer

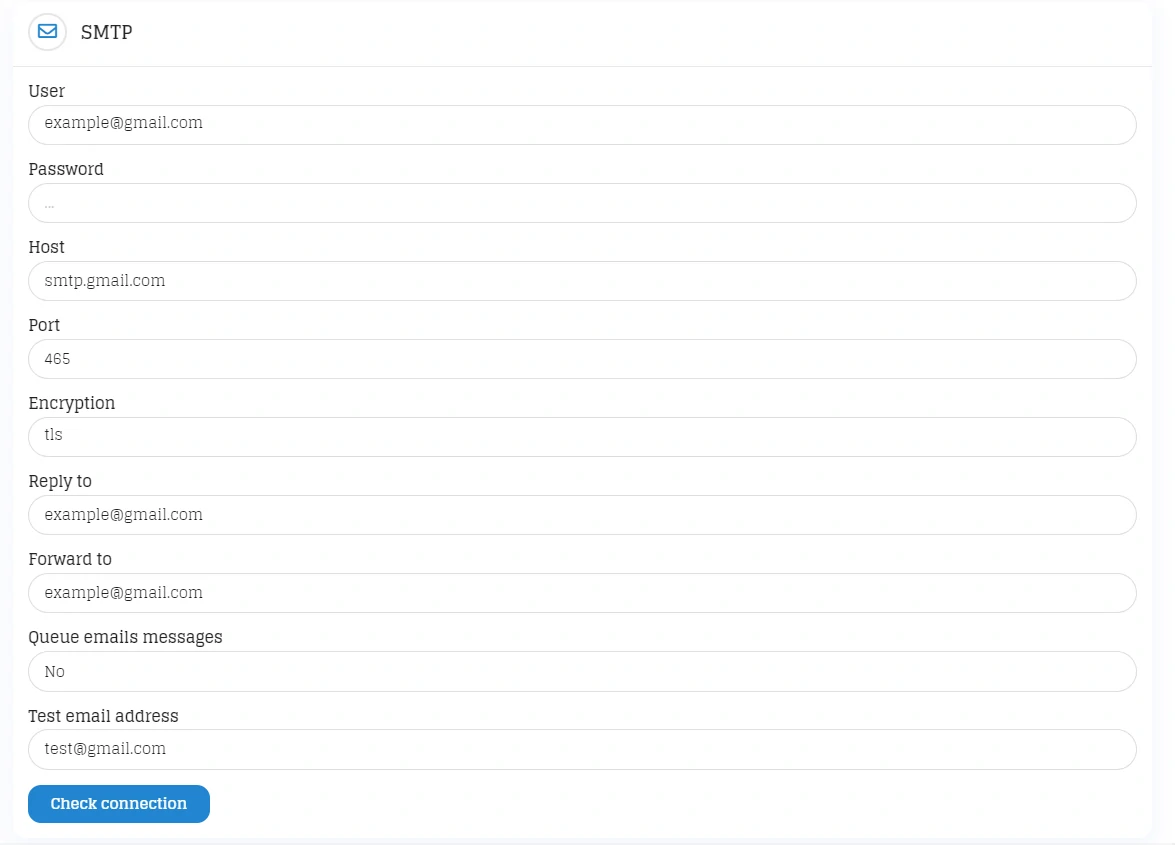
Configuring the mailer to send and receive email messages

Create an email account on your server
Enter your email account address in "User" field and the password in the "Password" field
Enter your sever host address in "Host" field
For the port and encryption, you can either use port "465" with "tls" encryption for a secure connection or port 587 with "tls" encryption for a none secure connection. If "tls" encryption doesn't work with port "465", try changing it to "ssl"
Enter a "reply to" email address, it'll be used as the email address to which users reply to when they respond to your messages.
Enter a "forward to" email address, all email messages sent to your server account address will be forwarded to this "forward to" address.
Turning on "Queue emails messages" requires creating a cron job to proceed email message on the background, this avoid users waiting for your server to send email messages.
You can check if the mailer credentials you entered are correct by clicking on "Check connection" button.
#Payment gateways
Admin > Settings > Payments

Configuring and enabling payment gateways, authorizing multiple currencies, enable / disable "Add to cart", allow / disallow guest checkout, enabling currency exchanger service ... etc.

PayPal
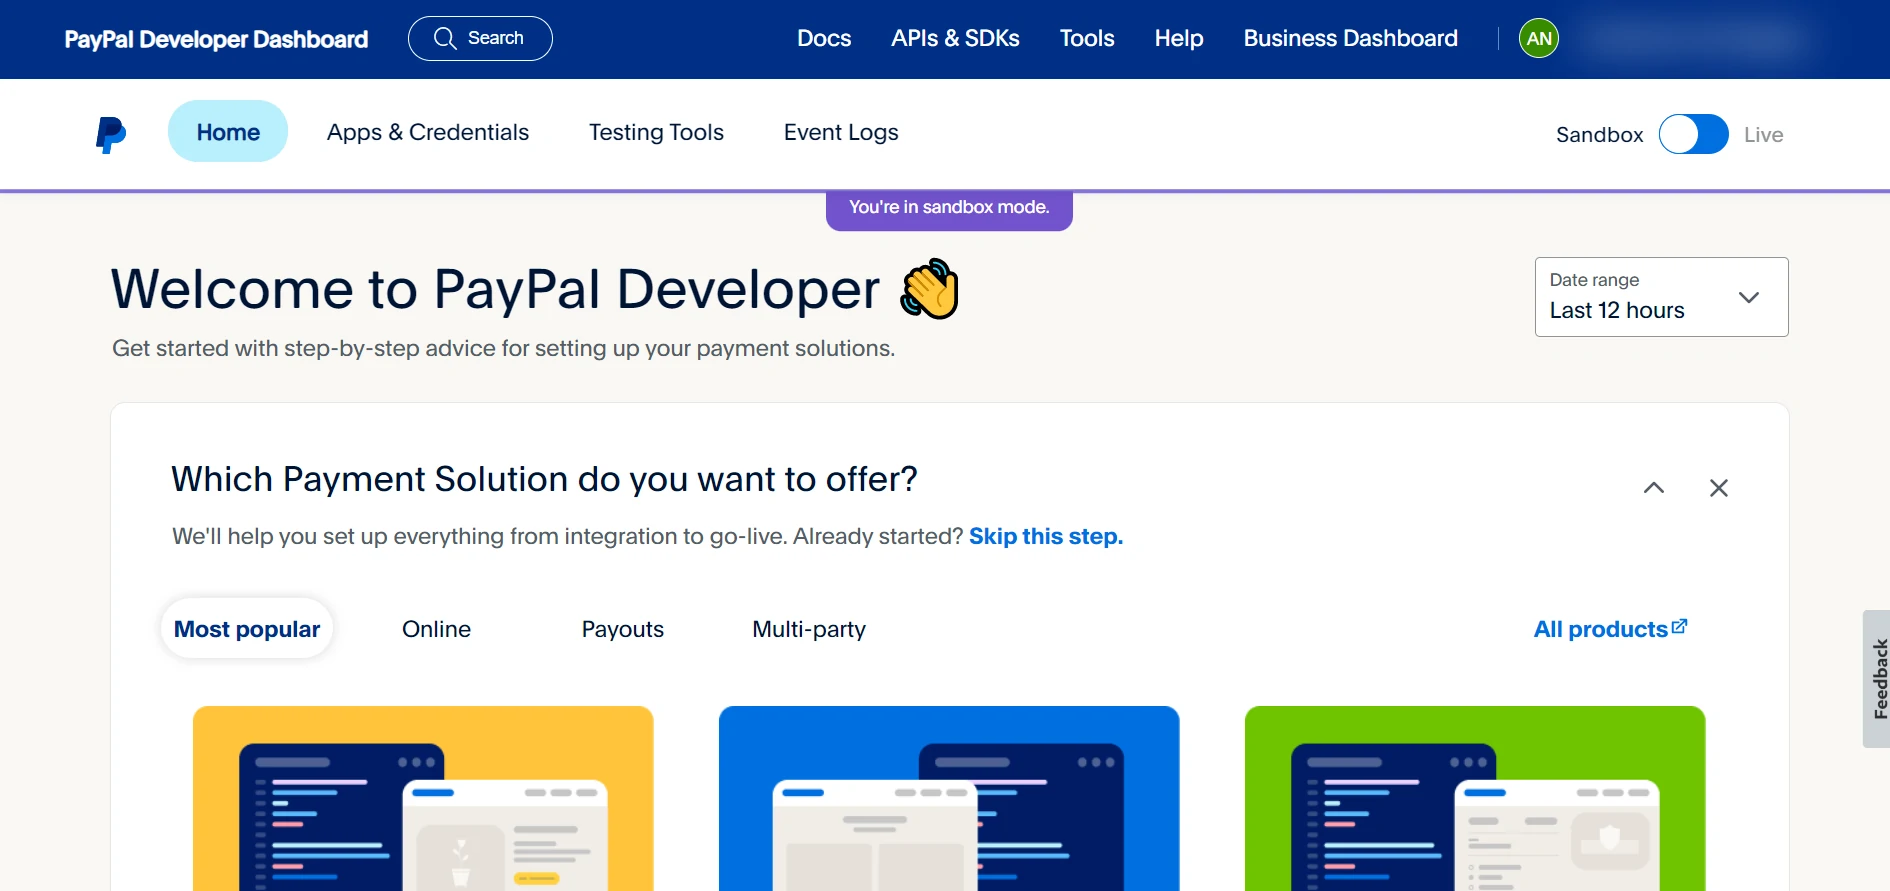
Create a PayPal business account
On the top menu, click on "Apps & Credentials" and then click again on "Create App" blue button
Enter a name for your application
For "App Type", select "Merchant - Accept payments as a merchant (seller)"
Select a sandbox account to use for testing payments / purchases, if you don't have one yet, you can create one from the top menu > Testing tools > Sandbox accounts, click on "Create account" blue button and select and an account type "Merchant" or "Personal", select a country and then click on "Create"
Click on "Create app" to terminate
On the next page, Copy the Client ID and Secret ID (click on Show to see it) and paste them to your website PayPal config page
For "App feature options" and "Webhook", leave everything as it is
Each mode (Test and Live) has its own credentials, when you change the mode, copy/paste the corresponding credentials to your website PayPal config again.
FlutterWave
Create a FlutterWave account and login to it
You can get your Public key and Secret key from the left menu "Settings / API"
Click on the Webhooks tab in the same page
In the webhook "URL" field enter : https://example.com/checkout/webhook (where example.com is your domain name)
In the webhook "Secret hash" field enter any random string of characters (like a pasword)
Check the first two checkboxes ["Receive Webhook response in JSON format" and "Enable Webhook retries"]
Copy the "Secret hash" to your website / admin / settings / payments / flutterwave config with the public and secret key.
You will need to add a bank account on the "Bank Accounts" tab to be able to process payment via bank transfer and other bank related methods other than cards especially on test mode.
You can switch modes [Live/Test] from flutterwave admin dashboard / left menu.
Test cards : https://developer.flutterwave.com/docs/test-cards
SslCommerz
Create a sandbox SslCommerz account from Here
You will receive your sanbox login credential via email
Login to your sanbox account from Here
Copy the Store id and the Store password to their corresponding fields in your website / admin / settings / payments / sslcommerz
Test cards : https://developer.sslcommerz.com/doc/v4/#payment-process-environment
Stripe
Create a Stripe account
Login to your Stripe account dashboard
On the left menu, click on "Developers" and then "API Keys"
You will have a "Publishable key" which is the Client ID in your website and a "Secret key" which is the Secret ID in your website. Those two keys or IDs are for testing only (paypal sandbox equivalent mode).
In order to get Keys/IDs for non-testing mode (Live mode) you wil need to fill in the form Here and submit it to stripe for review.
Test cards can be found Here
Changing stripe store name and widget color / logo
Login to your stripe account
On the left menu, click on "settings", then, select "Account information"
In "Public business information / Public business name" enter your new business (store) name
You can edit the other fields too, 'support email', 'Statement descriptor', 'Business website' ...
For wiget color and logo, back to the previous page and select "Branding" (Public business information / Branding)
Razorpay
Create a Razorpay account
Login to your Razorpay account dashboard
On the left menu, click on "Settings" and then "API Keys"
Copy the "Key Id" and "Key Secret" (you may need to click on "Generate Test key" blue button to get the necessary keys).
Copy/paste those IDs in your website Razorpay settings fields, enable Razorpay and save the changes.
In order to get Keys/IDs for non-testing mode (Live mode) you wil need to fill in the form Here and submit it to Razorpay for review.
Test cards can be found Here
Skrill
PDF documentation offered by skrill : https://www.skrill.com/fileadmin/content/pdf/Skrill_Quick_Checkout_Guide.pdf
Test merchant and test cards are in page 20 of Skrill_Quick_Checkout_Guide.pdf documentation.
Iyzico
Create a sandbox Iyzico account Here
Login to your sandbox Iyzico account dashboard
On the left menu, click on "Settings" and then on "Merchant Settings"
Click on "Show detail" for "API Key" and "Secret Key"
Copy/paste those IDs in your website Iyzico settings fields ("API Key" to "Key ID" and "Secret Key" to "Key Secret"), enable Iyzico and save the changes.
In order to get Keys/IDs for non-testing mode (Live mode) you wil need to create a non-sandbox account Here, activate your account via the received email and follow the required steps for applying to a business account.
Test cards can be found Here
CoinGate
Create a sanbox CoinGate account Here
Connect to your Coingate account
Create and App and get an Auth token following the instructions Here
Copy/Paste your Auth token in your website >> Administration >> Settings >> Payments >> Coingate >> Auth Token
Enter the currency (Code of 3 chars, e.g. USD) to which you want to exchange the received currency.
To get an Auth token for live mode, create a non-sandbox account here, and follow the same previous steps. You may be prompted to provide more details about your activity.
Midtrans
Create a Midtrans account Here
Connect to your Midtrans sandbox account Here
On the left menu click on "Settings" >> "Configuration".
For "Finish Redirect URL*" enter https://example.com/checkout/payment/order_completed/midtrans (where example.com is your domain name. Https ot Http depends on whether you have an ssl certificate or not.)
For "Unfinish Redirect URL*" enter https://example.com/checkout
For "Error Redirect URL*" enter https://example.com
Save the changes
Get your Client Key, Server Key and Merchant ID from "Settings" >> "Access Keys"
Copy/Paste them in your website >> Administration >> Settings >> Payments >> Midtrans
You can edit your Midtrans payment form preferences form Settings >> Snap Preferences
To switch to live mode, select "Production environment" in your Midtrans dashboard, and then follow the registration steps Here
Paystack
Create a Paystack account Here
Connect to your Paystack account
On the left menu, click on "Settings" and then on "API Keys & Webhooks" tab. (no need to enter a 'Callback URL' and a 'Webhook URL')
Copy/Paste your "Test Secret Key" and "Test Public Key" in your website >> Administration >> Settings >> Payments >> Paystack.
Once done with testing, you can activate your account following the instrcutions in This page
Adyen
Create a Adyen account Here
Connect to your Adyen test account Here
To generate API credentials, follow the instructions in This page
Copy/Paste your "API key", "Client key" and "Merchant account" in your website >> Administration >> Settings >> Payments >> Adyen
Test cards can be found Here
To activate live mode, connect to your Adyen test account and click on "Apply for live"
Instamojo
Create a business Instamojo test account Here
Connect to your Instamojo test account Here
On the left menu click on "API & Plugins"
Copy/Paste your "Private API Key", "Private Auth Token" and "Private Salt" in your website >> Administration >> Settings >> Payments >> Instamojo
To switch to live mode, create a business Instamojo non-test account and proceed as before.
YoucanPay
Create an account from this page
Login to your dashboard
On the left menu, click on "settings"
On the profile page, scroll down and click on "API keys"
You'll have the API keys for two modes, Test mode and Live mode, copy the keys to your website Youcan pay settings (Admin > Settings > Payments > YouCanPay), select the appropriate mode and save the chagnes
On Your YoucanPay dashboard / profile page, do not specify the "Success URL" and "Error URL", just leave them empty.
Click on "Webhooks" and again on "Add webhook"
On "Webhook url" field enter "https://www.example.com/payment_webhook" where example.com is your domain name
You can toggle Sandbox mode depending on which mode you're using
For "Events" list, select "Paid transactions" and click on "Add webhook" to finish the creation.
You may need to Verify your identity later when you decide to use Live mode.
Test cards https://youcanpay.com/docs#section_testing_and_test_cards
Offline payments
Enter your bank account details
How it works
The buyer completes his/her offline purchase
His/her purchase is marked as pending
He/she transfers the purchase amount to your bank account
You validate the transfer in your bank account
You mark the payment status as paid in your website > Administration > Transactions. If the transfer is not done, the buyer won't get access to the purchased items as long as you don't mark the payment or transactions as "Paid".
Other payment configs

- Each payment service has an otpion to specify a minium amount to pay if a buyer decides to use "Pay what you want" rather than the default price.

- You can drag and drop the payment cards to change the order payment services will be shown with for buyers.

- By specifying an "Auto exchange to" currency, to force the payment gateway using this currency instead of the user seleted one.

- The Credits payment service is used with Prepaid credits feature, to allow users purchsing with their E-wallet.

VAT (Tax)
You can specify a VAT (Value Added Tax) to apply on your sales. (Put 0 if not applicable)
Fee
You can set a fee for each payment method independently. (Put 0 if not applicable)
Main currency (Code & Symbol)
A currency code (ISO format "GBP, USD, CAD ...") and a symbol if there is any (the "currency code" is mandatory).
Currency position
The place where to show the currency with the price, left or right.
Allow foreign currencies
Whether to accept receving payments in foreign currencies or not. This implies the use of a Currency exchanger API if enabled.
Currencies
A selection of currencies in which users can see the prices of your products, and optionally, purchase with if "Allow foreign currencies" is enabled.
Currency exchange API

Select an API to use for the exchange rates.

You can specify an exchange rate manually for each currency based on the main one, in "config/payments.php", in currencies array, change null value for exchange_rate to your custom one and save the changes, this way the exchange rate will be obtained from config/payments.php file and not the API.

Note : "api.coingate.com", "api.exchangerate.host" and "api.exchangeratesapi.io" are free, while you must get an API key for "api.currencyscoop.com".

To get an API key for "api.currencyscoop.com", register to one of the pricing plans Here, you will find your API KEY in your account page.

Allow guest checkout

This allows users to purchase items without beeing connected, after they complete their purchases, they will be given an access token to gain access to the purchased items.

Allowing guest checkout, makes an option available in the footer of your website (your website's users/visitors/buyers interface), this option is called "Guest section", a page where users can enter a guest access token to get a list of purchased items.

Currency position
The place where to show the currency with the price, left or right.
Require agreement to the market TOS
Make accepting TOS required to checkout
TOS page URL
A url path to the page of checkout TOS
Allow buyers to add notes on orders
Allow buyer writing notes before proceeding to the payment, this may be used to allow users asking for other attached services or customizations.
Enable "Pay What You Want"
Offer an option for buyers to pay a different price than the product or subscription regular price.
Change user currency based on his country
Select a default currency based on the user location / country
Enable add to cart
Enable / Disable "Add to cart", With this option disabled, the "Shopping cart" icon will be removed from the menu.
Show prices in K format
Show prices in multiple of 1000, this can useful for currencies like crypto or IDR to avoid showing a long number.
Delete pending orders in x hours
Auto delete orders with a "Pending" status if the status doesn't change to "paid" after x hours.
#File storage services
Admin > Settings > Storage

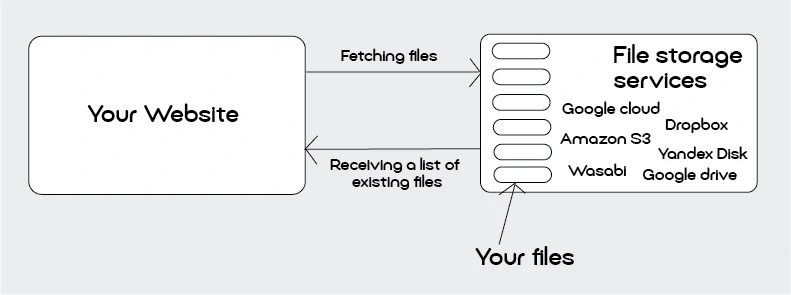
Configuring Google cloud storage, Dropbox, Amazon S3, Wasabi, Yandex disk and Google drive.

You can use your local server storage without opting for any external storage service.

Amazon S3
Create an Amazon aws account from this page https://aws.amazon.com/s3/
Login to your aws account as root user
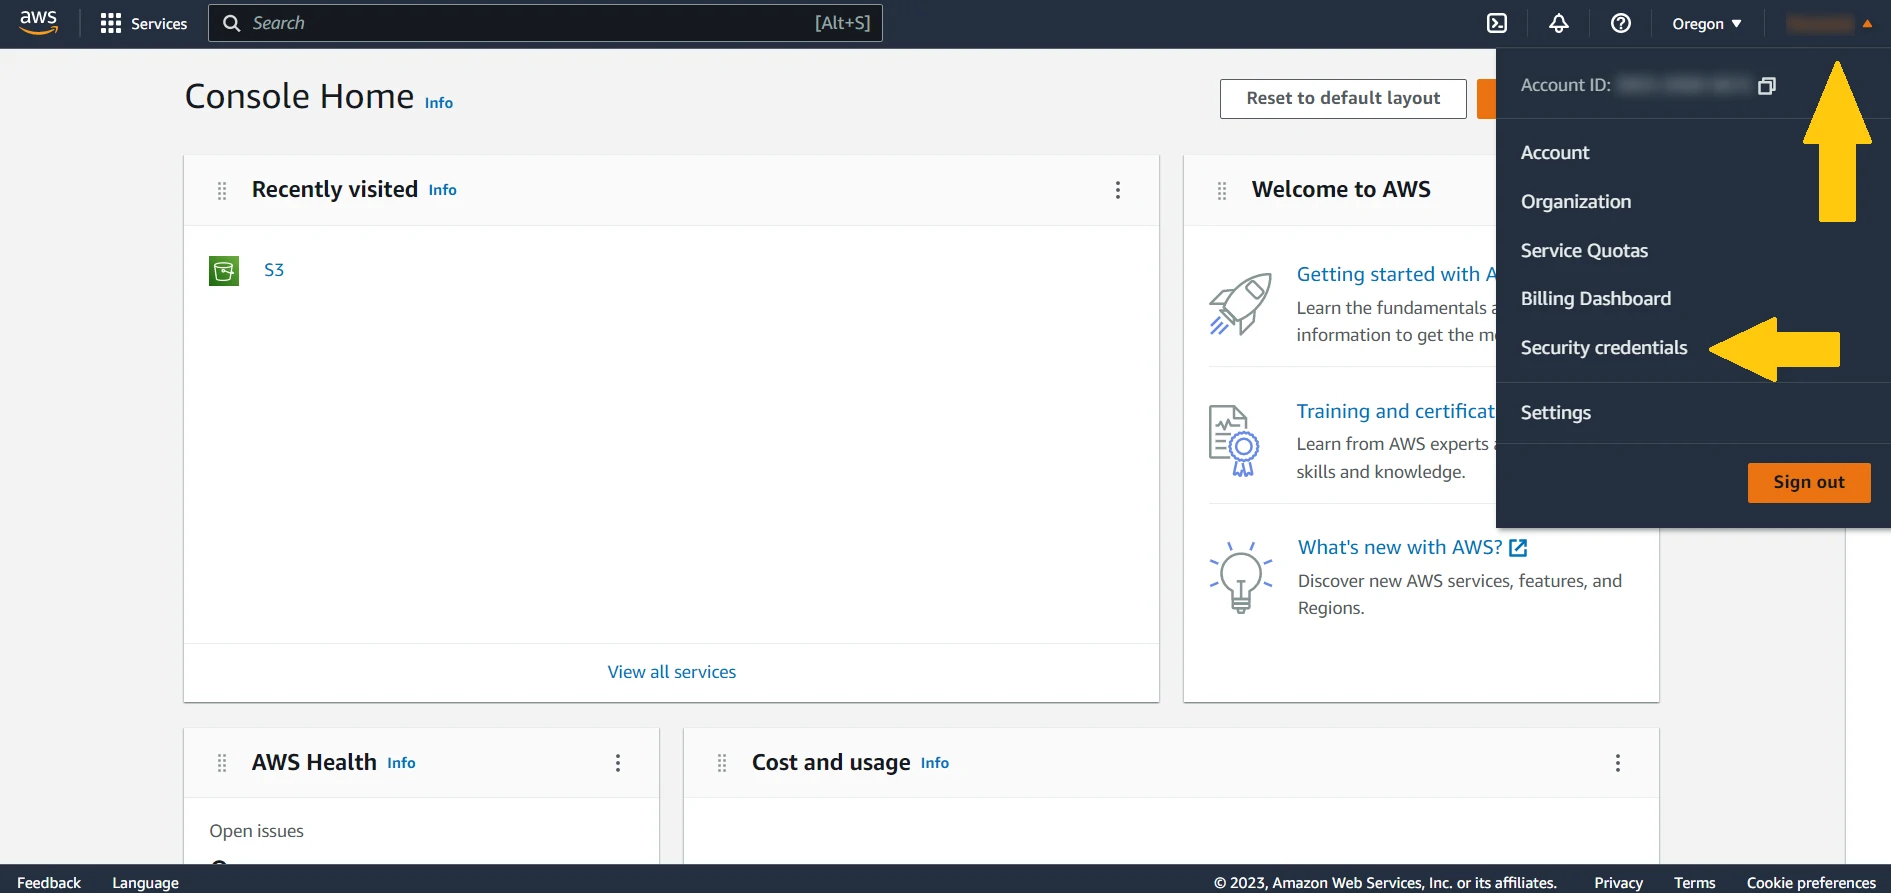
Click on your profile name at the top right corner, and select "Security credentials"
Scroll down to "Access keys" and click on "Create access key"
Check "Continue to create access key?" box and click on "Create acces key" orange button
Copy the "Access key" and "Secret access key" to your website amazon s3 settings
Click on "Done" orange button (You can download the csv file as a backup to use later)
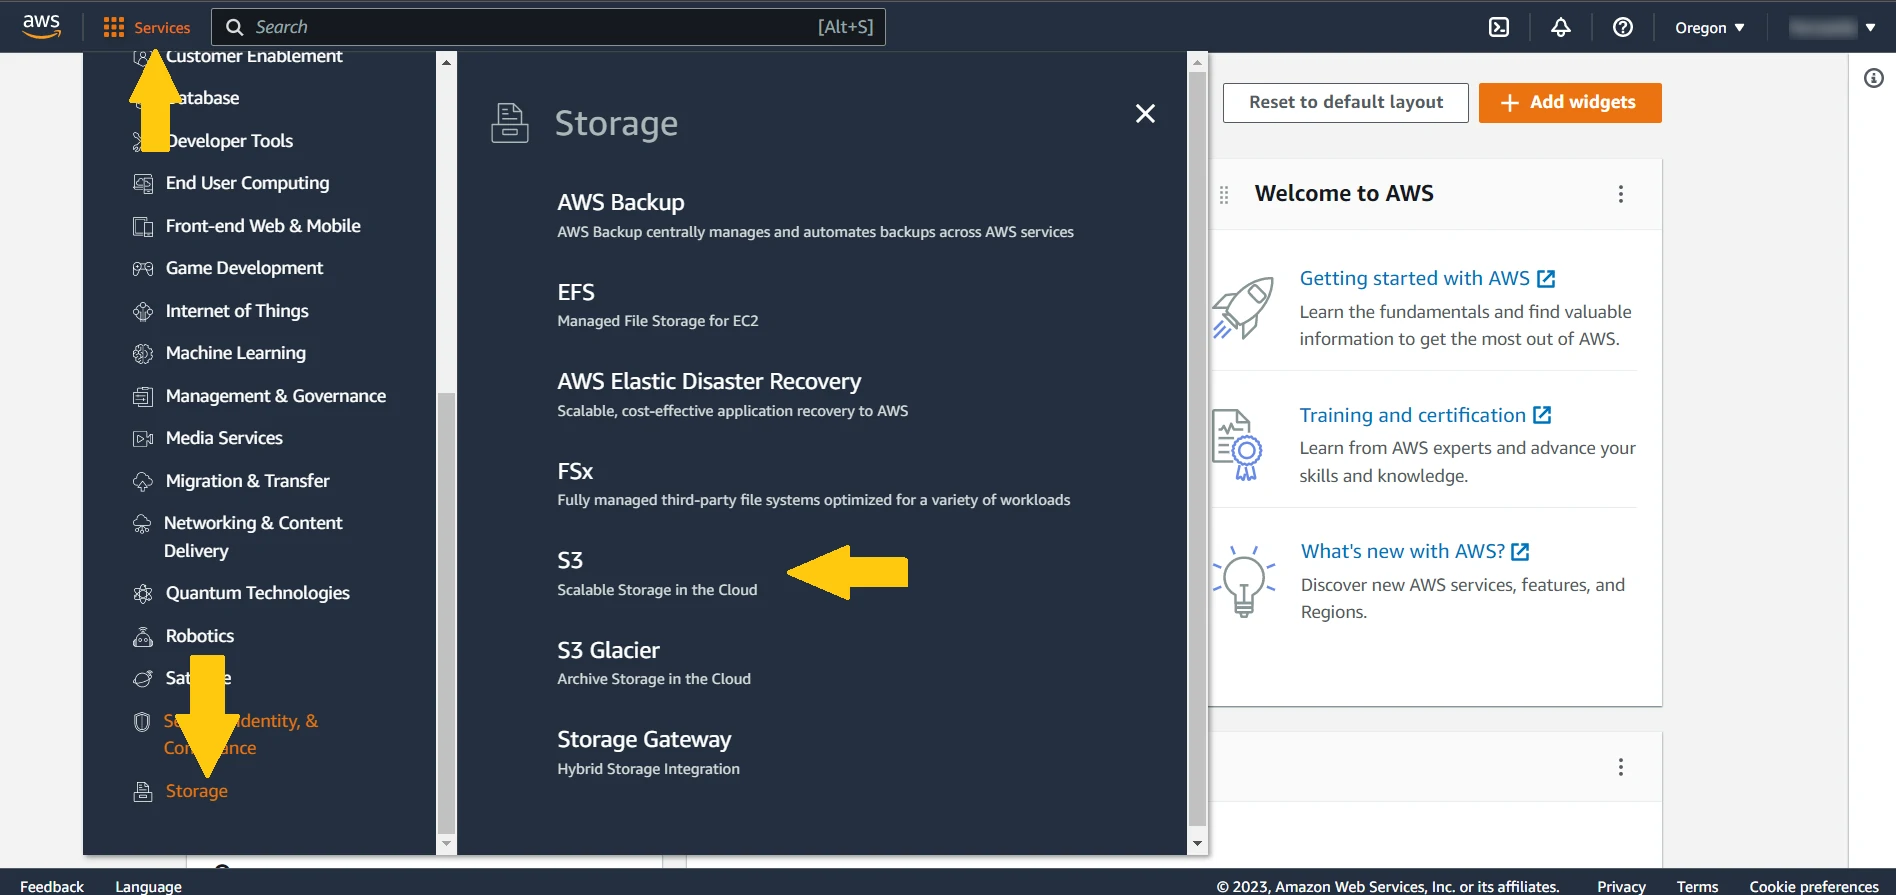
On the top menu, left corner, click on "Services" and select "Storage" > "S3"
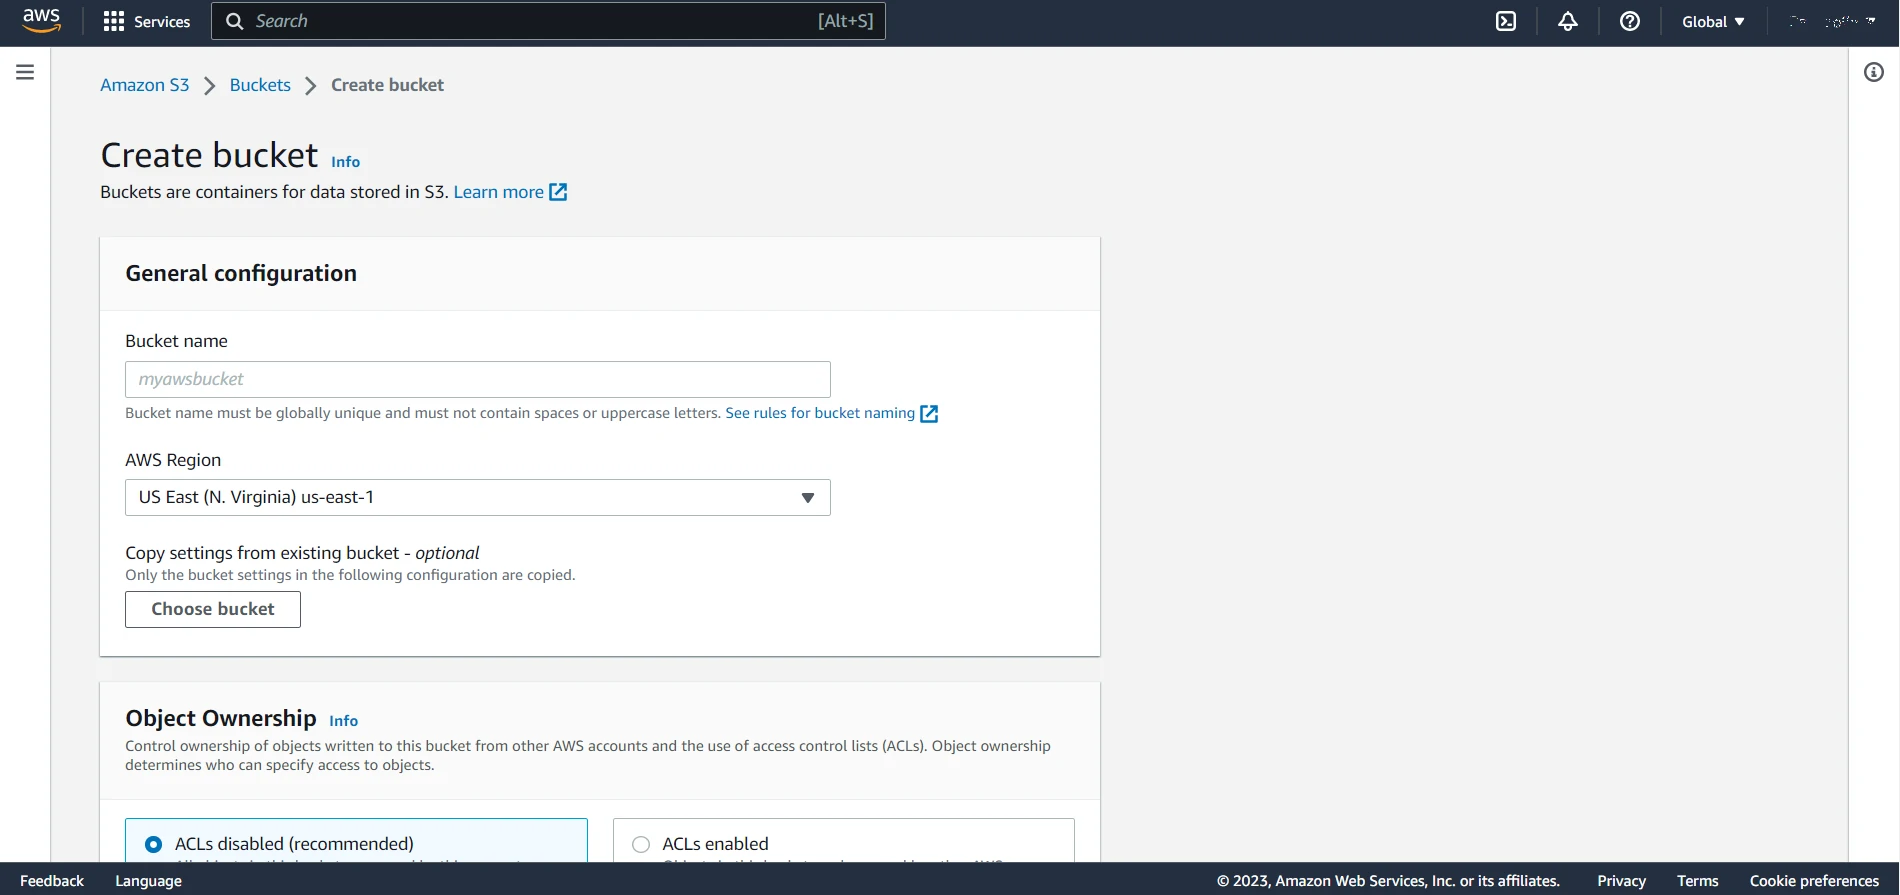
Click on "Create bucket" orange button
Enter a name for your bucket and select and AWS Region, leave the other fields and options unchanged, scroll down and click on "Create bucket"
Copy the bucket name and AWS region (us-west-2 or other region) to your website amazon s3 settings
On your website amazon s3 settings, click on "Check connection" to make sure the config is correct.
Enable amazon S3 and save the changes
Back to amazon S3 / buckets page, click on the bucket name you've just created and upload your files
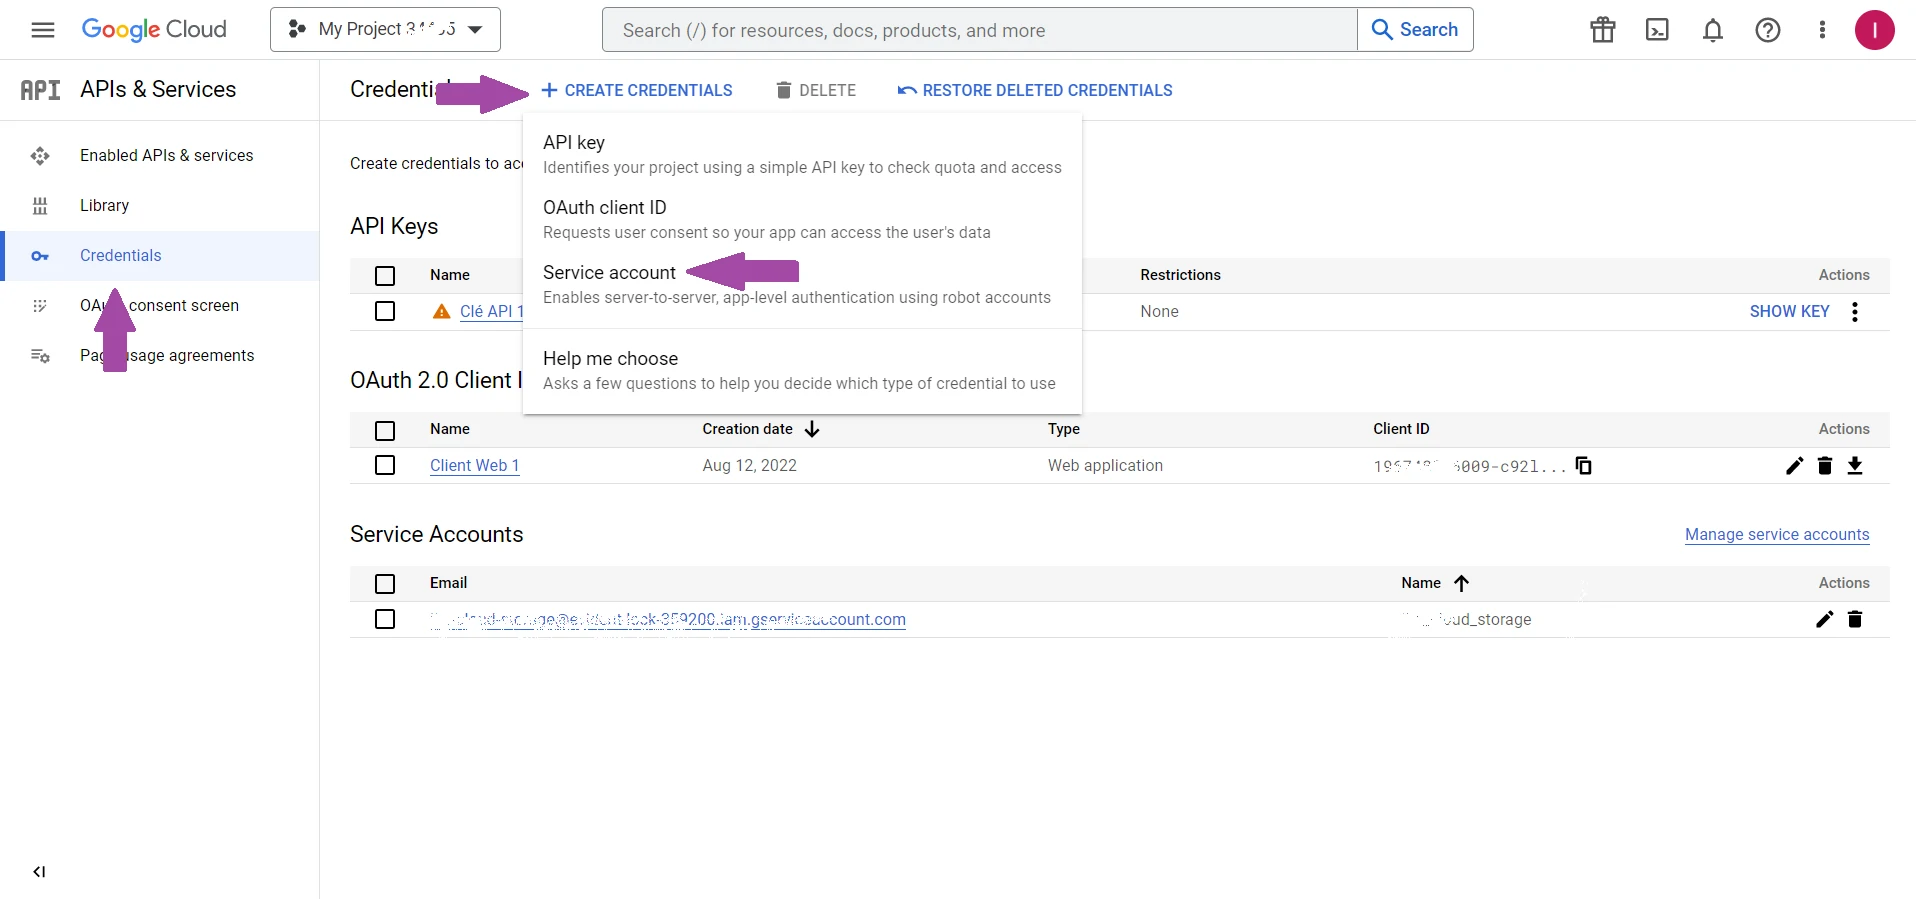
Google Cloud Storage
Connect to Console Cloud Googlewith your prefered gmail account
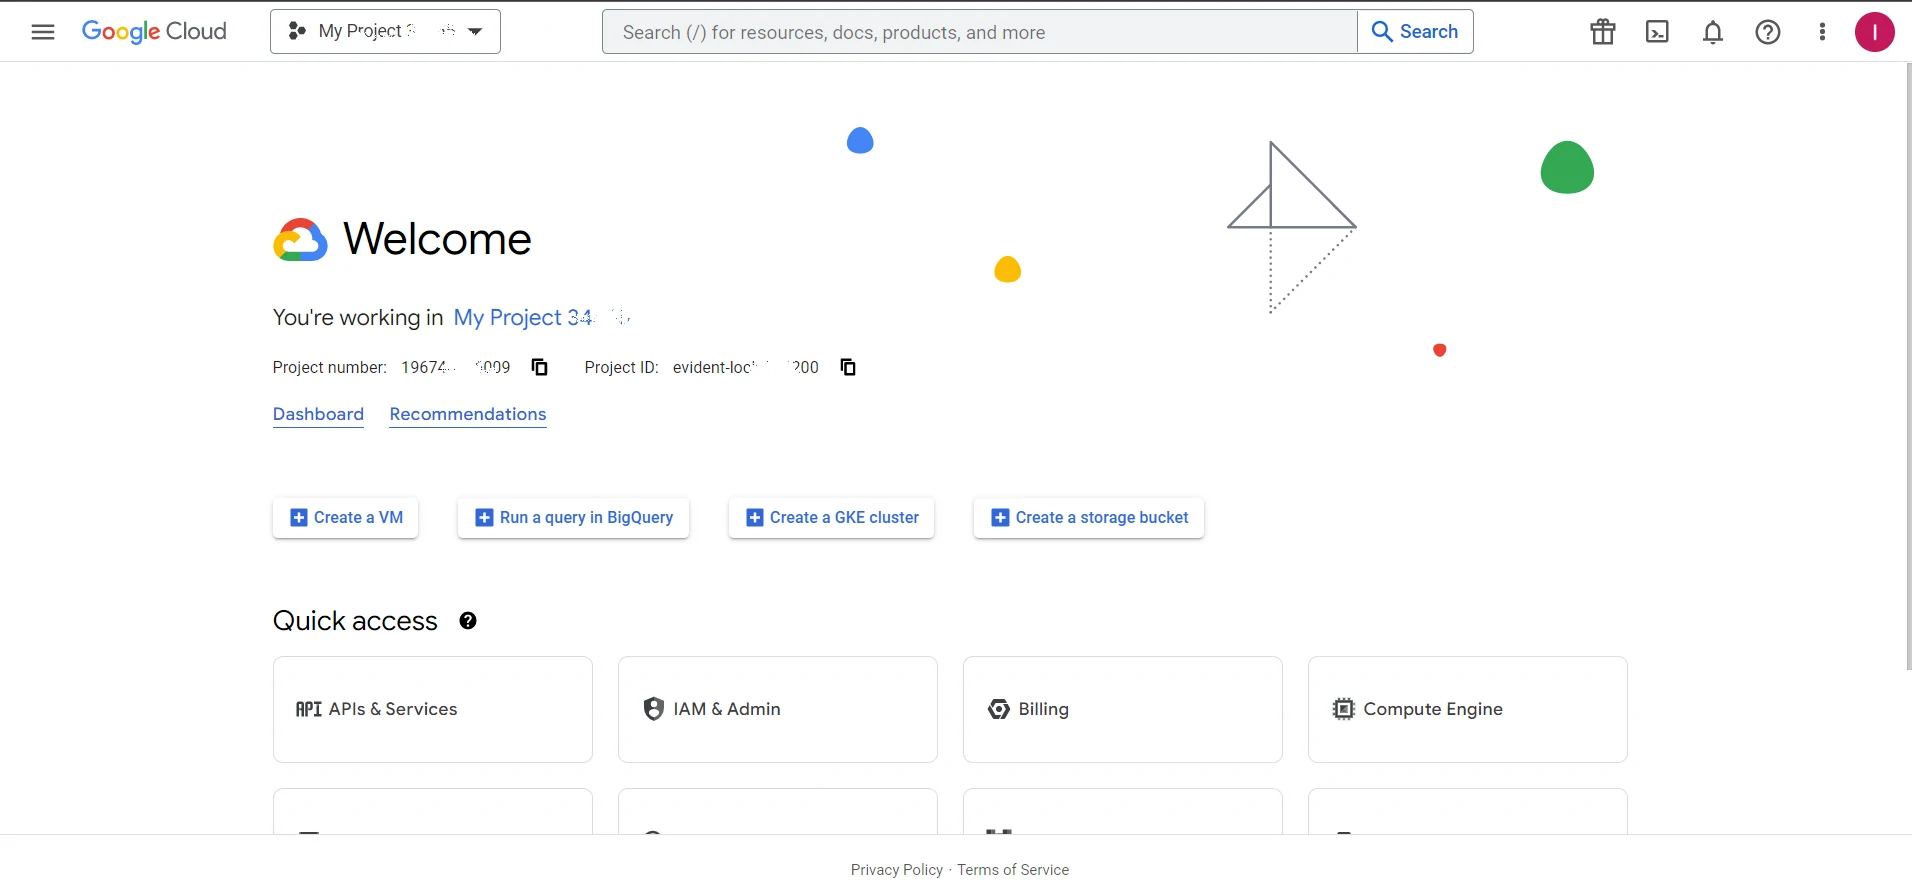
On the "Quick access" section, open "APIs & Services" in a new tab
On the left menu, select "Credentials"
On the top menu, click on "+ Credentials" and select "Service account"
On "Service account details", enter a name for the service account (any name), the account id will be auto-generated (no need to change it), a description for the service account (any description)
Click on Continue
On the "Role" list, select "Owner" and click on Continue
For "Grant users access to this service account", leave everything empty and click on "Done"
Once back to the Credntials page again, scroll down to "Service Accounts and click on "Edit service account" icon for the account you've just created
Click on "Keys" on the top menu
Click on "Add key" and then on "Create new key", for "Key type" select JSON
Back to your website Admin > settings > storage > Google cloud storage, click on "Config file" and select the file that was auto-downloaded from google console page
keep "Google cloud storage" disabled on your website and save the changes
Back to google credentials page and click on "Create" to close the popup
On the first google page "https://console.cloud.google.com/", click on "Create a storage bucket"
Sign up for a free trial and complete the registration
Once you complete the registration and create a bucket, copy the bucket name to your website Admin > settings > storage > Google cloud storage > Bucket field, and click on "Test connection", if you get a "success" message, click on "save" to finish with Google cloud storage settings.
Wasabi
Create an account here
Connect to your account https://console.wasabisys.com/#/login
Click on "Create bucket" blue button
Give your bucket a name
Select a region
Click on next, next and on 'Create bucket'
Copy/Paste the bucket name and the region name to your website Wasabi settings
Back to Wasabi, on the left menu, click on 'Access keys'
Click on 'CREATE NEW ACCESS KEY' blue button
Select 'root user' and click on 'Create'
Copy/Paste the Access Key and Secret Key to your website wasabi settings
In your website wasabi settings, click on 'Test connection' to check if the entered data is ok, you will get a 'success' response if the connection is established, otherwise, you'll get an error message.
Enable Wasabi and save the changes.
Yandex disk
Login to Yandex Disk https://disk.yandex.com/
Access https://oauth.yandex.ru/
Click on 'Register a new app'
Enter a name for your application
A brief description for your application
An Icon for your application
A Link to your website
In 'Platform' select 'Web services'
In 'Callback URI #1:' enter https://example.com/admin/settings/files_host (where example.com is your domain name)
You can add multiple callbacks, like with www and without www ...
In 'Access*' click on 'Yandex.Disc REST API' and check all the choices
Scroll down to the bottom of the page and click on 'Create an app'
Copy/Paste the ID and the password to your website yandex disk settings
Save the changes
In your website yandex disk settings, click on 'Connect account' to connect one of your yandex disk account to your website.
Once the connection is done, a refresh token will be put in 'Refresh token' automatically.
Enable Yandex disk and save the changes again
Google drive
Login to Google Console API with your prefered gmail acccount
Click on "Select a project" at the top left corner and select or create a new project in the popup window
At the top bar, click on "+ ENABLE APIS AND SERVICES"
Search for "Google Drive API", select it and then click on "ENABLE" (the blue button)
On the left menu, click on "Credentials" and then on '+ CREATE CREDENTIALS' and select 'API key'
Copy/Paste the API key in the popup to your website admin > settings > storage > Google Drive config and close the popup window.
Again, on "Credentials" page, click on "+ CREATE CREDENTIALS" and select "OAuth Client ID"
In "Application type" select "Web application"
Enter a name for your application
Click on "ADD URI" for "Authorized JavaScript origins" and enter your website url with www and without wwww (https://example.com and https://www.example.com)
In "Authorized redirect URIs" click on "ADD URI" and enter "https://example.com/gd_callback" and "https://example.com/login/google/callback" with www and without www (change example.com to your domain name or subdomain)
At the bottom of the page, click on "Create"
Download the JSON file as a backup from the popup window
Copy the "Client ID" and the "Client secret" to your website google drive settings and click on "Ok" to close the credentials popup window.
On the left menu, click on "OAuth consent screen"
In "App Domain", enter your website homepage url, the url for your website Privacy policy page, the url for your website terms and conditions page
In "Authorized domains", enter your website domain name, like "example.com" and another with "www.example.com"
In "Developer contact information", enter an email address to use as developer email (User support email and Developer email can be the same)
Save and continue
In "Scopes" step, leave everything unchanged and click again on "Save and continue"
In "Optional info" step, again leave everything unchanged and click on "Save and continue"
In "Summary", scroll down and click on "Back to dashboard"
In "Auth consent screen" page, click on "PUBLISH APP" and "Confirm"
Back to your website admin > settings > storage > google drive, keep Google drive disabled and save the changes
Once the changes are saved, connect your Google drive account by clicking on "Connect" button.
Note : When you try to connect your gmail account, you may get a "This app isn't verified" warning message, just click on "Advanced" (a grey underlined text) and click on "Go to ... (unsafe)"
Click on "Allow" to give your "Google Console APP" the authorisation to use your google drive (see, edit, create and delete files in your google drive) and again click on "Allow"
You can connect with a different gmail account whenever you want, if you want to use files from another google drive.
Dropbox
Login to your Dropbox developers Here with your prefered email
Once in, click on "Create app"
Select "Dropbox API"
Select whether you want to get files only from the app folder or all dropbox.
Give a name to your application, it's going to be your App folder's name, so, if you've choosen "App Folder" above, your requests to dropbox will be limited to this folder, else, to your whole dropbox.
Click on "Create app"
Once done, your App Key and APP Secret will be on the given page, copy/pase them into their respective fields in your website / settings / file hosts / dropbox, and save the changes (Update)
For the "Redirect URIs", put "https://www.example.com/admin/settings/files_host" and click on "Add" (https is required)
If you want this app this be uesd by different accounts, click on "Enable additional user" at the top of the page, by that, your app will be allowed to be used by 500 users (accounts) as max.
Back to you website /settings / file hosts / dropbox, click on "Connect", connect with the dropbox accont you want to use, click on "Continue" and then "Allow", you will be redirected to your website with an "access token" place in its place for dropbox.
Enable Dropbox if you want, save the change and that's it.
Important : For all file storage services, you need to upload the files directly to the storage service, not from your website

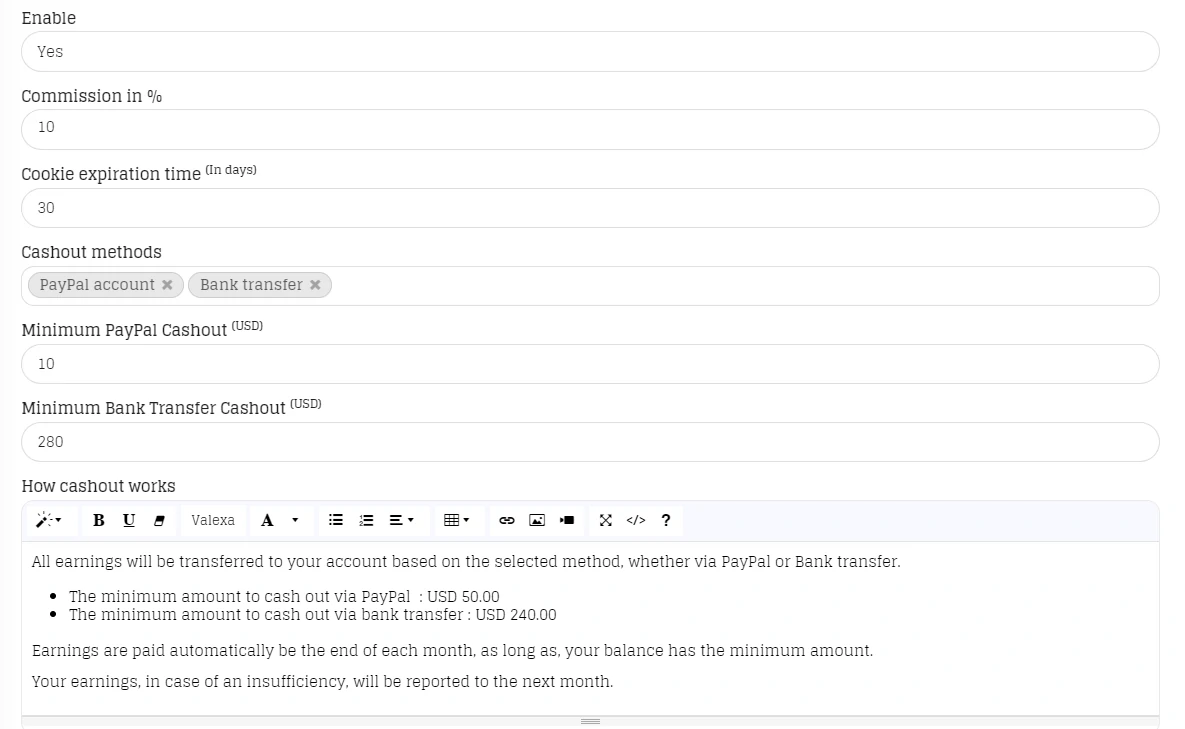
#Affiliate
Admin > Settings > Affiliate
Configuring affiliate program, commission rate, cashout methods, minumum cashout amount ... etc.
#Social login
Admin > Settings > Social login

Allow users connection using their social accounts, Dribbble, VKontakte, Google, Linkedin, Github ... etc.

Dribbble
Connect to https://developer.dribbble.com/ and click on "Register your application"
Enter a name and description for the application, enter your website url (https://www.example.com)
For "Callback url" enter https://www.example.com/login/dribbble/callback (change example.com to your domain name)
Accept the Dribbble API Terms & Guidelines and click on "Register application"
Copy and client id and client secret to your website / admin / settings / social login / dribbble settings
Enable Dribbble and save the changes
Google
Copy the "Client id" and "client secret" from google drive settings if you already configured google drive

If you didn't configure google drive, please proceed with the folowing steps :

Login to Google Console API with your prefered gmail acccount
Click on "Select a project" at the top left corner and select or create a new project in the popup window
On the left menu, click on "Credentials" and then on '+ CREATE CREDENTIALS' and select 'OAuth Client ID'
In "Application type" select "Web application"
Enter a name for your application
Click on "ADD URI" for "Authorized JavaScript origins" and enter your website url with www and without wwww (https://example.com and https://www.example.com)
In "Authorized redirect URIs" click on "ADD URI" and enter "https://example.com/login/google/callback" with www and without www (change example.com to your domain name or subdomain)
At the bottom of the page, click on "Create"
Download the JSON file as a backup from the popup window
Copy the "Client ID" and the "Client secret" to your website google drive settings and click on "Ok" to close the credentials popup window.
On the left menu, click on "OAuth consent screen"
In "App Domain", enter your website homepage url, the url for your website Privacy policy page, the url for your website terms and conditions page
In "Authorized domains", enter your website domain name, like "example.com" and another with "www.example.com"
In "Developer contact information", enter an email address to use as developer email (User support email and Developer email can be the same)
Save and continue
In "Scopes" step, leave everything unchanged and click again on "Save and continue"
In "Optional info" step, again leave everything unchanged and click on "Save and continue"
In "Summary", scroll down and click on "Back to dashboard"
In "Auth consent screen" page, click on "PUBLISH APP" and "Confirm"
Back to your website admin > settings > social login > google and save the changes
Linkedin
Create a Linkedin account (if you don't have one)
On "My Apps" dropdown menu, select "Create app"
Enter a name for your app, a company name
In "Privacy policy", enter the url to your website privacy policy page
Upload a logo for your linkedin app
For "Products" leave everything as is
Accept the "Legal terms" and hit "Create" button
Once done, from the previous dropdown menu (My Apps), select the App you've just created
Select "Auth" on the top menu, scroll down to "Redirect URLs:" and enter "https://example.com/login/linkedin/callback"
At the top of the same page, you have your Client ID and Secret ID shown as 'Client Secret' for your Linkedin app
Copy/Paste those IDs to their respective fields in your website / settings / social login / Linkedin
Github
Create a github account (if you don't have one)
Login to your github account
On the profile dropdown menu, select "Settings"
On the left menu, select "Developers settings" (the last option in the menu)
On the left menu, click on "OAuth Apps" and then "New OAuth App"
Enter a name for yout application and a description
For "Homepage URL" enter your website url
For "Authorization callback URL" enter "https://www.example.com/login/github/callback" (change example.com to your domain name), once finished, click on "Register application"
Click on the application you've just created, you'll see your Client ID and Secret ID, (you can upload a logo for your github application if you want to)
Copy/paste the Client ID and Secret ID to their respective fields in your website (settings / social login / github)
VKontacte
Create a VK account (if you don't have one)
Login to VK Dev here
At the top menu, click on "My Apps"
Click on "Create app"
Give your app a title
On "Platform" select "Website"
In "Website address" and "Base domain" entre respectively "https://www.example.com", "example.com" (change example.com to your domain name)
Thereafter, click on "Connect website"
In "Terms and Conditions" enter the url to your website terms and conditions page
In "Privacy Policy" enter the url to your website privacy policy page
In "Screenshots" Upload an image for your application if you want to
On the left menu, click on "Settings"
Scroll down to "Authorized redirect URI" end enter "https://www.example.com/login/vkontakte/callback" (change example.com to your domain name)
In "Website focus" select your website activity
The "App ID" at the top serves as "Client ID" and "Secure key" as "Secret ID" for your VKontacte login settings
That's it, don't forget to enable it and save the changes.
Facebook
Create a Facebook account (if you don't have one)
Login to Facebook Developers Here
From "My Apps" dropdown menu, select "Create App"
Give a name to your App and a contact email and then click on "Create App ID"
In "Add a Product" click on "Set up" for "Facebook Login" product
In the left menu, under "Facebook Login" click on "Settings"
In "Valid OAuth Redirect URIs" put "https://example.com/login/facebook/callback" (change example.com to your domain name)
In the left menu, click on "Settings" and then "Basic"
In "App Domains" enter your domain name with and without www. (without https)
In "Privacy Policy URL" enter the url to your website privacy policy page
In "Terms of Service URL" enter the url to your website terms and conditions page
In "Category" select which category your website's activity belongs to
The Client ID and Secret ID are at the top of the page (Settings / Basic), copy/paste them to their places in your website / settings / social login / facebook
#Search engines
Admin > Settings > Search engines

Index Now API, site verification codes, Analytics codes, JSON+LD

By default, the website loads the necessary meta tags for SEO, you can enable or disable showing JSON+LD format in addition to meta tags.
All site codes, from google, yandex, bing ... can be entered in "Site verification" field (paste the full HTML code as given by the search engine)
All analytics codes, from google, yandex, bing ... can be entered in "Analytics code" field (paste the full HTML code as given by the search engine)
You can obtain an Index now API key from https://www.bing.com/indexnow#generateApiKey
#Chat
Admin > Settings > Chat

Chat services like Tawk, Crisp, Getgist ... etc.

Copy the code provided by the chat service to your website Admin / Settings / Chat / "Chat service" field and enable it
#Captcha
Admin > Settings > Captcha

Google reCaptcha and Mewebstudio captcha.

Google reCaptcha
Connect to Google reCaptcha with one of your google accounts
Enter a label
Select reCAPTCHA v2 and then "I'm not a robot" Checkbox
Accept the reCAPTCHA Terms of Service
Click on Submit
Copy/Paste the site and secret keys to your website > admin > settigns > catpcha > google recatpcha
#Translations
Admin > Settings > Translations

Add more language translations to your website

Select a language
Translate the value on the left side to your language on the right side without changing or translating the red parameters.
If a text is missing, you can add it from the form at the bottom of the page.
Once you finish the translation for all the texts, save the changes
Open Settings >> General and add the newly translated language to your website supported languages. It's also possible to have only one language.
#Database
Admin > Settings > Database

Adjusting the database configuration

Important : Generally, you won't need to change anything in this page, except the timezone or running some database queries for testing.

To execute a database query: you need to specify the query type first, whether it'll be executed to update, delete, insert, select some records or it's for something else (statement)
#Cache
Admin > Settings > Cache

Clearing cached template files, tokens, user sessions and other cached data.

You will probably need to clear the views cache if you're editing template files
You may need to clear the cached tokens to regenerate them for some payment gateways and file storage services
#Maintenance
Admin > Settings > Maintenance

Enable / Disable maintenance with IP acception, expiration time.

in "IP address to exempt", you can enter your IP address to keep having access to your website for a customization or debugging.
You can enable "Auto disable" option to turn off maintnance mode automatically once the expiration time is reached
#Bulk upload
Admin > Settings > Bulk upload

Upload products in bulk.

Important : We recommend testing bulk upload locally first if you intend updating an existing website which already have products.

Click on "CSV data file" and select a CSV file containning your products data
Click on "Cover" and select all covers of your products (the covers names must be the same as the one stored in the CSV file)
The main files are optional, if available, proceed the same way as with covers
Once the CSV data file is selected, the dropdown lists will have titles found in the CSV data file
Attach each column/header on your CSV to the appropriate column in vAlexa script (example, if you have a column named "Summary" in your csv, this column is named "Short description" in our script, if you have a column named "Description" the script has this column named "Overview" ... etc), so you select "summary" for "short description" and "description" for "overview" ... etc.
Once done with the columns adjustments, submit the form.